
Common Fence Failures After a Kitchener Winter: 2026 Prevention Guide
TL;DR
- Start with hazards: isolate unstable sections, damaged pool barriers and exposed sharp or electrical components before routine inspection.
- Diagnose the whole assembly because leaning, gate drag and loose panels can have several contributing causes.
- Separate cosmetic weathering from active deterioration, structural movement and hardware failure.
- Do not excavate to investigate a footing until public and private utility responsibilities are resolved.
- Record spring conditions with dated photographs and measurements, then repair the cause rather than only the visible symptom.
A Kitchener winter can expose weaknesses that were already developing in a fence. Cold temperatures, moisture, freeze-thaw cycles, wind, snow loads, drainage and normal material movement may all contribute, but an observed symptom rarely proves one cause. A safe spring review starts with condition, context and consequence.
Why spring is a useful inspection point
The local 1991 to 2020 climate record from Environment and Climate Change Canada reports a January daily mean near minus 6.3 degrees Celsius. The seasonal transition gives owners a practical opportunity to observe movement, drainage and coating condition after sustained cold.
An annual review does not mean every defect is winter damage. Some failures result from age, impact, poor drainage, underspecified hardware, decayed material, installation conditions or changes around the site. Describe what you see before assigning blame.
Walk both sides of the fence where access and permission allow. Photograph the overall line first, then individual posts, rails, panels, fasteners, gates and ground conditions. Repeat photographs from similar positions in later seasons to distinguish stable imperfection from active change.
Use a hazard-first inspection sequence
Stop routine inspection and restrict access if a section could fall, a sharp component is exposed, a gate no longer secures a pool enclosure, or electrical equipment appears involved. Do not apply force to assess instability.
Use this order:
- People and animals: Keep children, pets, pedestrians and vehicles away from the affected area.
- Required barriers: Treat a failed pool gate or enclosure as urgent. Kitchener states that pools capable of holding more than 36 inches of water require an enclosure and identifies a 1.5-metre minimum enclosure height in its pool safety guidance.
- Utilities: Do not dig around posts until locate responsibilities are complete.
- Neighbour and public areas: Control any section that could enter another property, sidewalk or road.
- Condition review: Inspect stable sections without climbing, striking or force-testing them.
Municipal summaries can change. Confirm current requirements with the City before relying on a fence as a required enclosure.
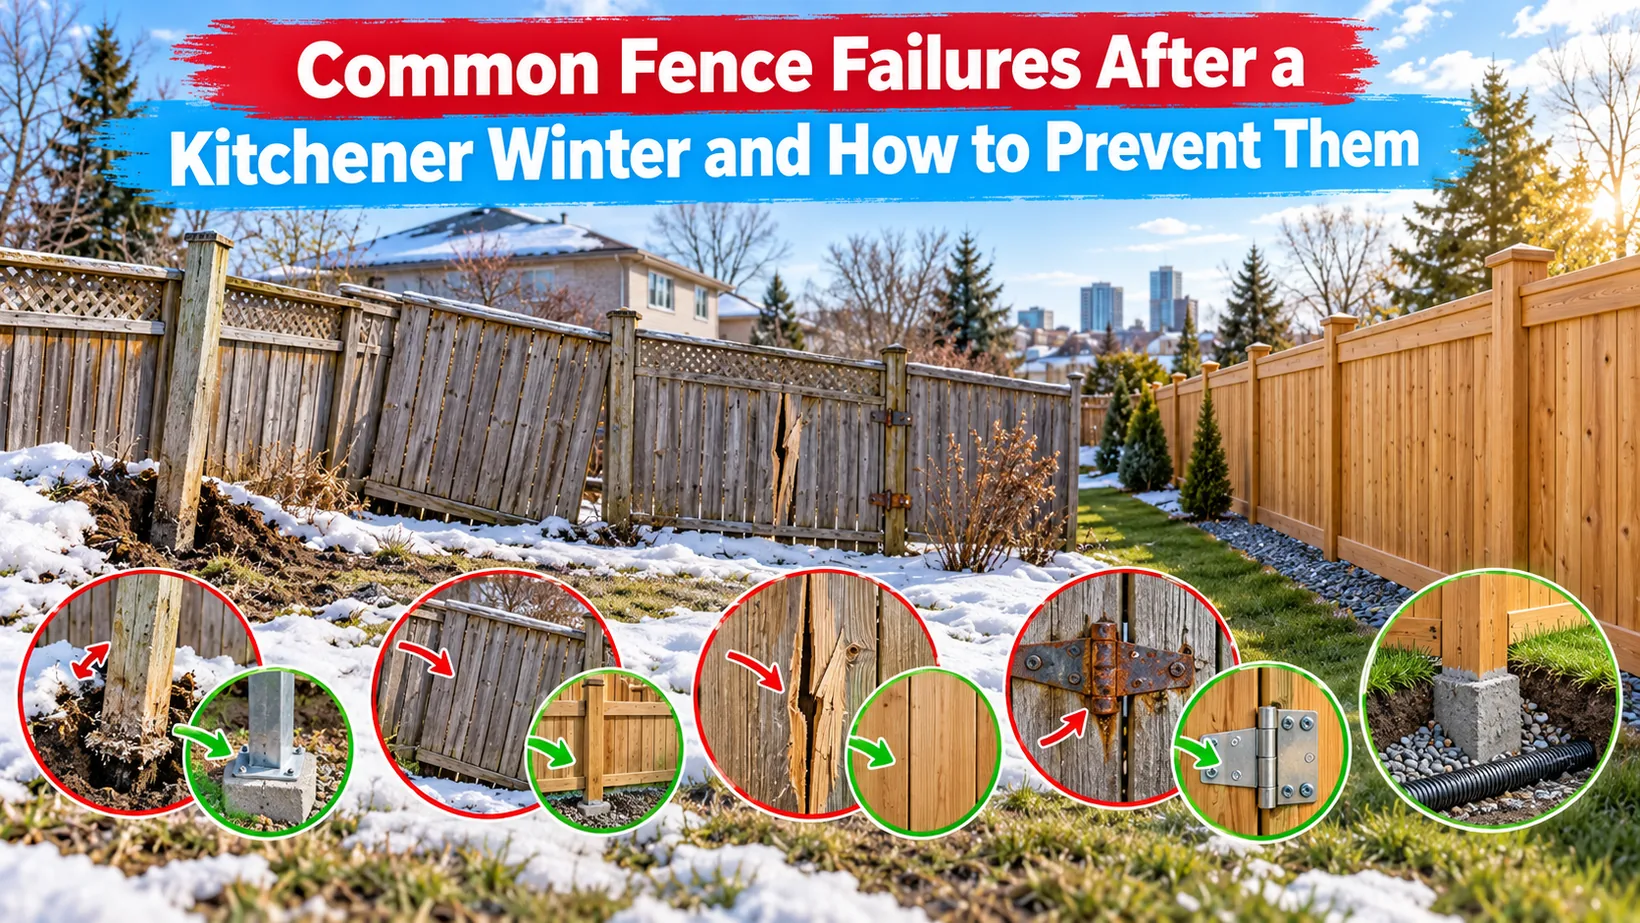
Failure 1: leaning posts or an uneven fence line
A leaning post may coincide with soil movement, drainage, footing condition, impact, wind loading, decay or corrosion. The visible lean does not identify which factor controls the repair.
Stand back and sight along the fence. Record whether one post, several consecutive posts or the entire line has moved. Note nearby downspouts, low areas, roots, paving changes and evidence of impact. Do not probe aggressively around a footing.
Call a contractor when movement is new, increasing, affects a gate, loosens connected panels or creates a hazard. The assessment should distinguish the failed element from components that can remain.
Prevention focuses on water management, appropriate site-specific design, sound materials and regular observation. Redirecting water should not create a problem on a neighbouring property. Obtain appropriate advice before changing drainage.
Failure 2: a gate drags, will not latch or changes alignment
Gate trouble can come from post movement, hinge wear, frame distortion, loose fasteners, ground obstruction or latch adjustment. Repeatedly adjusting only the latch may conceal a moving post or distorted frame.
Check the opening without forcing it. Observe the clearance at the top, latch side and ground. Look for loose hardware, corrosion and fresh scrape marks. Record whether the problem changes with temperature or moisture.
For a pool enclosure, a gate that does not reliably perform its required function deserves immediate professional and municipal attention. Do not use a temporary prop or improvised latch as a substitute for compliance.
Prevention includes periodic hardware checks, keeping the swing path clear and correcting movement before it transfers load to hinges or latches. Use replacement components suited to the actual system and exposure.
Failure 3: loose rails, panels or fasteners
Wind and repeated movement can reveal weak connections. Wood can shrink and swell, metal connections can loosen or corrode, and panels can transfer force to adjacent components.
From a safe position, inspect for missing fasteners, enlarged holes, split rails, detached brackets and panels that no longer sit in their intended supports. Avoid pulling a loose panel to judge strength.
One missing fastener may be a small repair. Multiple failed connections, cracked structural members or movement across several bays suggests a broader assessment. Reusing damaged holes or incompatible fasteners can shorten the repair life.
Prevention requires compatible hardware, correct installation and prompt attention to early looseness. A contractor should specify what is being refastened, what must be replaced and how the repaired area connects to retained work.
Failure 4: wood checking, greying, softness or decay
Wood naturally changes outdoors. National wood durability guidance distinguishes weathering from decay: weathering affects appearance and surface condition, while decay involves fungi and suitable moisture conditions.
Grey colour alone does not prove structural decay. Small surface checks can also differ from deep splits or soft material. Look for persistent wet areas, end-grain deterioration, loose fibres, fungal growth and loss of section around connections.
Do not hide suspected active deterioration under a cosmetic coating. A knowledgeable contractor should decide whether the component is sound, repairable or due for replacement. Finishes can manage appearance and surface weathering, but they cannot restore lost structural material.
Prevention includes selecting suitable material, keeping vegetation and trapped debris from retaining moisture, managing water and maintaining finishes according to the product system. Record the coating used and application date so future maintenance is compatible.
Failure 5: corrosion on metal fencing or hardware
Corrosion often begins at cut edges, scratches, connections, trapped moisture or dissimilar-material interfaces. Light surface staining and significant section loss require different responses.
Inspect posts, rails, fasteners, hinges, latches and the bottom edge of components. Note blistering coatings, red rust, white corrosion products, seized hardware and thinning metal. Do not grind or coat material until the system and safe preparation method are known.
A repair may involve cleaning and a compatible touch-up system, hardware replacement or component replacement. The correct response depends on material, coating, exposure and depth of damage.
Prevention includes compatible hardware, prompt treatment of coating damage, removal of trapped debris and keeping drainage paths open. Avoid universal coating advice because manufacturer systems differ.
Failure 6: heaved, washed-out or damaged footing areas
Raised ground, a gap around a post or local washout can indicate movement or erosion, but surface appearance does not reveal footing depth or condition. Excavation may also encounter buried utilities.
Ontario One Call's excavation page tells homeowners to submit locate requests five full business days before any digging. It also distinguishes public utility notifications from private infrastructure, which may require a private locator.
Do not dig around a post as a casual diagnostic step. Assign who requests public locates, who identifies private lines and who has authority to excavate. A contractor can then expose or replace the footing under a defined scope.
Prevention depends on site-specific design, drainage and installation. Avoid prescribing one universal footing dimension without soil, load, system and site information.
Diagnose before choosing repair or replacement
Use a four-level condition matrix:
| Level | Typical observation | Appropriate next action |
|---|---|---|
| Monitor | Stable cosmetic change with no functional effect | Photograph, date and recheck |
| Maintain | Coating wear, debris or minor compatible hardware care | Follow the product system |
| Repair | Local functional defect with sound surrounding work | Obtain a defined repair scope |
| Restrict and assess | Instability, sharp exposure, failed required barrier or widespread deterioration | Isolate the area and seek qualified help |
The matrix is a triage tool, not an engineering judgement. When uncertain, move to the safer response.
Ask a contractor to provide a condition map. Each post, panel, rail and gate should be labelled keep, observe, fix or renew. The proposal should explain what evidence would change that decision after work begins.
Build a spring prevention record
A repeatable record is more valuable than a vague annual promise. Create one row per fence run and gate.
| Check | Record |
|---|---|
| Alignment | Overall photographs and any measured change |
| Ground and drainage | Ponding, washout, downspouts and grade changes |
| Wood | Finish condition, checks, softness and moisture traps |
| Metal | Coating damage, corrosion and connection condition |
| Gates | Clearance, hinge condition, latch function and closing behaviour |
| Connections | Missing, loose, damaged or incompatible hardware |
| Interfaces | Decks, retaining features, vegetation and neighbouring work |
| Action | Monitor, maintain, repair, restrict or assess |
Date each entry and note major weather, impact or landscaping changes. Keep invoices, material information, photographs and warranty documents together.
Recheck repairs through the next season
A repair is not fully informative on the day it is completed. Record the final fence line, gate clearances, visible footing area, hardware and surface condition. Use consistent photographs so later comparison is meaningful.
Recheck after a major storm, prolonged wet period and the next cold season where practical. Look for renewed movement, water accumulation, coating breakdown or hardware changes. The timing should suit the system and any contractor or manufacturer instructions.
If the same symptom returns, share the original condition map, approved repair, photographs and warranty terms with the contractor. This helps distinguish an unresolved cause from new damage. Do not keep operating a gate or leaning section when renewed movement creates a safety or enclosure concern.
What to require from a repair contractor
A useful repair quote should include the observed condition, proposed cause as confirmed or preliminary, affected area, retained work, replacement components, access, locates, restoration, price and completion check.
Require separate treatment of hidden conditions. The contract should explain what happens if excavation reveals a different footing or if retained components are not sound. No added work should proceed without documented approval.
Ask how the repair affects the existing warranty and what warranty applies to new components. A broad promise is less useful than a clear term, exclusions, response route and responsibility boundary.
For a multi-material or mixed residential and commercial site, verify that the contractor's experience matches the actual system. Company breadth can help with diagnosis, but site evidence should control the recommendation.
The prevention rule
The most common post-winter fence symptoms are leaning, gate misalignment, loose connections, wood deterioration, corrosion and disturbed footing areas. None proves its own cause. Start by controlling hazards, especially unstable sections and failed pool barriers, then document the whole assembly.
Kitchener's cold seasonal conditions make spring a useful observation point. Canadian Wood Council guidance helps distinguish wood weathering from decay, and Ontario One Call requires locate planning before diagnostic excavation.
Prevent repeat failure by repairing the cause, not only the symptom. A strong contractor handback will map what remains, what changes, which unknowns may alter the plan and how the owner confirms safe, functional completion.